30/06/2013

Can't live with, can't live without

There are some products that as much as I love them, also drive me crazy. Today I'm sharing two which I can't live with and can't live without.


YSL false lash effect mascara

This is my dream mascara, but only for about 4 weeks. It gives the perfect false lash look, doesn't clump and lasts all day. The downside? It dries out so fast! Every tube I've had does the same thing. Now, I like to wear a lot of mascara, but something just isn't right here. I don't mind paying £23 for a mascara that does everything I want it too, but having to buy a new one each month is not ok in my books.

Seche Vite quick dry topcoat

This does exactly what it says in the tin and offers a quick dry, glossy topcoat for nails. I use it virtually every time I paint mine and love the effect, but what I hate is how it goes gloopy in the bottle! It's like it's drying out whilst still inside, and after a few months becomes virtually unusable. Other people I've spoken with have the same issue - it's so annoying! If you have any other quick dry topcoat recommendations please let me know!

Are there any products you can't live with but can't live without?
Share:

29/06/2013

Guest post: how to ombré nails

The lovely Helena is guest posting for me today, with a fab tutorial for ombré nails. I will definitely be trying this out myself! Over to you Helena...

Hey everyone! I’m Helena from The Edge of Beauty. Kat has kindly let me guest post on her blog today, so that I can share with all of you beautiful people how I do my ombré nails. So a huge thanks goes out to you Kat for having me on Tales of a Pale Face.

I learnt this ombré method from an amazing beauty guru on YouTube called Amarixe. You can find her video on how to create this look here.

All you need to have to recreate what I’m doing here is shown in the picture below.

Ombre nails tutorial

You will need:
Tape, Scissors, Sponges, 3 Nail Polishes, and 1 Top Coat.
Optional extras include Q Tips and Nail Varnish Remover.

Ombre nails tutorial adding sellotape

First I start off by applying tape around the edges of my nails to help make the tidying process later a lot quicker. Obviously the sponge will get polish on the sides of your nails too, so it is important to prevent that from transferring onto the skin, as this can ruin the look you’re trying to achieve.

Following this step, I will trim the sponge to the size of my thumbnail, which helps to make sure there is as little mess as possible.

Ombre nails tutorial polish choices

I then go ahead and choose the polishes that I want to use to create my ombré look. If you pick colours that are too similar it will be hard to see the ombré effect, so it’s nice to pick a reasonable contrast. It’s also a lot easier to use three colours instead of two as I find that the final gradient is a lot smoother.

Ombre nails tutorial polish choices

I have picked two Ciaté polishes that I got from my Ciaté Advent Calendar last year and one that I received in a beauty box. Hopefully some of you will have these colours so that you can recreate this look. However you can pick whatever colours you would like, so definitely feel free to get creative J

Left to right:

Ombre nails tutorial step 1

Now you need to start painting the polish onto the sponge in stages. Start with the colour you want at the base of your nail near the cuticle. Mine is the baby pink shade (Cutie Pie). Make sure that there is plenty of polish on the sponge as it can sometimes soak up the product and leave you with nothing to transfer onto the nail later on.

Ombre nails tutorial step 2

Now you can apply your middle colour, which is my coral polish (Speed Dial). Make sure that this joins to your first shade and try to keep all amounts equal on the sponge.

Ombre nails tutorial step 3

Finally you can add your last colour, which is the bronze shade for me.

After you are happy with how your sponge looks, just turn it over and press it onto your nail. You may need to do this a few times, stippling up and down the nail slightly to create an effect your happy with.

Repeat this on all of your nails and apply a topcoat to seal the deal. You can then peel off your tape and remove any excess polish around the edge of your nail with a Q Tip.

Ombre nails tutorial finished result

And you should be left with something that looks a little like this!

I really hope that you enjoyed this tutorial and that you go ahead and recreate this ombré nail look yourself. If you do, I’d love to see it. Definitely tweet me a picture @edgeofbeauty7 or Instagram it using the hash tag #edgeofbeautyombre and I will be sure to check them out and if I get enough I will create a post with all your photos on my blog.

Thanks so much for reading this post and a huge thank you again to Kat for letting me guest post. It’s been so much fun. If you would like to see more beauty posts and perhaps some fashion and baking ones too, you can head over to my blog where I post new reviews daily J

I hope to see you over there soon.
Speak to you later!


Helena xxo

Share:

28/06/2013

Alternative uses for salt spray

I love to use a salt spray in my hair sometimes to help create a beachy wave, but after attending a recent Bumble and Bumble event, I picked up a few tricks on how else salt sprays can be used, with amazing effects.

Bumble and Bumble Surf Spray and Balmain salt spray

Beehive created with Bumble Surf Spray
The Bumble Beehive - I think Sven (crouching) is a miracle worker.

1. Adding volume - If you have fine hair (or just want bigger hair), applying a small amount of salt spray to the roots of your hair will help give it some added oomph, lifting it at the roots.

2. As a styling product - At the event, I had a hair makeover and the stylist managed to create the most amazing beehive using just Bumble Surf Spray and 10 hair grips (I counted). With some backcombing and plenty of salt spray to help hold it in place, my usually floppy fine hair stayed in place all night even when battered by the wind.

3. As emergency dry shampoo. Now, this isn't something you want to do too often, but as salt sprays have a drying effect on hair, they tend to help it look that little bit more matte, and in an emergency can be used to soak up a bit of oil in hair. Probably one tip best suited to festival hair when an undone look is what you're aiming for anyway!

My salt spray picks:

Balmain - great for adding texture, root lift and creating beachy waves
Toni and Guy - creates very natural beachy waves without much effort at all
Bumble and Bumble - works amazingly as a styling product, gives good root lift, and helps hold backcombed styles in place.

Have you tried any salt sprays before?

Share:

27/06/2013

Fake tan testing: Fake Bake 60 minute tan

Fake tanning often conjures up mental images of having to sleep overnight while your tan develops, running the risk of brown bed sheets and a streaky result.

Fake Bake have come up with the perfect solution, creating a tan that develops in only 60 minutes.


The 60 minute tan comes in liquid format, and is best applied with a sponge mitt. The lotion is brown, enabling you to see where you've applied it to, ensuring that no random white bits pop up (we've all been there).

Despite having a pump spray bottle, Fake Bake advise you to spray the tan onto the mitt, before rubbing into the skin using circular motions. Like all tans, you need to prepare skin before application - use a body scrub to remove any dead skin cells and moisturise beforehand for best results.

I found the 60 minute tan really easy to apply - the lotion is quite runny, but using the mitt helped ensure that it didn't go everywhere, and made an even application a lot easier. The lotion itself dries quite quickly, so after about 5 minutes, I popped on a pair of shorts, and did some housework while the tan developed.

Fake Bake advise you to leave the tan on for 1 hour for a light tan, 2 hours for a medium tan and up to 3 hours for a deep tan. The packaging does recommend not leaving it on for longer than 3 hours - I assume that this is because you will turn out a bit mahogany if you do so!

I left mine on for about 90 minutes before washing it off in the shower, and was left with a very even, natural looking, golden tan. It lasted a good 4 days before fading, and I didn't experience any obvious patchiness as it faded.

If you're looking for a tan that you can do in a hurry, I think this would be perfect. It's also great for people that want just a subtle hint of colour as you can modify the depth of colour by how long you leave it on for. I'll definitely be using this again throughout the summer.

Fake Bake 60 minute tan costs £24.95 and can be found in John Lewis, and online at Feel Unique, Amazon and other stockists.


Share:

26/06/2013

Amie New Leaf Skin Exfoliating Polish review

I could sum this review up very quickly and just say 'the best smelling facial scrub EVER', but I know you all love a little more detail than that. 

The Amie New Leaf Skin Exfoliating Polish*, is a fantastic, bargain buy from natural skin care brand Amie. Made without parabens, mineral oil, sulfates or animal extracts, Amie products promise great results without a high price tag, and are suitable for all skin types.


The New Leaf Polish contains bamboo and jojoba microbeads to remove dead skin cells  and mango and cocoa seed butters to help moisturise the skin. They also make the product smell divine! If you like fruity scented products, I really recommend this scrub.

The scrub is best used on damp skin, rubbing a small amount gently across the face, avoiding the eye area. I usually do this for around 30 seconds, and then rinse off using warm water.

It leaves my skin feeling bright and exfoliated, but without any dry feeling at all. The mango and cocoa seed butters really do a great job at retaining moisture in the skin, even after a thorough exfoliation.

The best part of the Amie range is the price. Not only are the products really effective, but they are also friendly on the wallet. The New Leaf skin polish is £4.95, and even used twice a week, the tube will last a good few months.

Also in the Amie range are a clay mask (which is equally good), 5 different types of cleanser, and two moisturisers. The entire range cost less than £5 each, so perfect for anyone on a budget, and I think I prefer this scrub to some of the more expensive ones I've tried in the past.

You can find Amie online via their website, or in store at Waitrose and John Lewis.


Share:

25/06/2013

Top Toner picks

I love a good toner to help refresh skin after cleansing, or even as a mild exfoliant. If you've not used a toner before, they are usually of a water consistency, and tend to be used post cleansing (but before moisturiser) to help remove any last traces of make up and refresh the skin.

Traditional toners were full of alcohol and often dried skin out, giving them a bad reputation, but these beauties definitely won't do that!

facial toners

Here are my top toner picks:

Pixi Glow Tonic – This falls into the ‘exfoliating toners’ category and contains small amounts of glycolic acid which help to break down dead skin cells. I use it every other night, dampening a cotton pad and sweeping it over my face. It’s not easy to get hold of, purely as it’s not stocked online, but the Pixi store in London will post one to you if you order over the phone. Full review here. £16 250ml

Apivita Honey and Orange Tonic Lotion* - Perfect for normal to dry skin, this toner is really refreshing, with a fruity scent. Instead of a water base, Apivita use a green tea infusion which helps enhance the antioxidant properties of the product. This toner is free from alcohol, parabens, mineral oils and other nasties, so great for natural skincare lovers. £13 200ml

Elemis Apricot Soothing Toner* – Designed to refresh and calm skin, the Apricot toner is ideal for sensitive skins. It has a slight fruity scent, and I apply using a cotton pad. It leaves my skin feeling really refreshed, but with no dry feeling at all. This is possibly my favourite toner out of all of them here. £21 200ml

Sukin Hydrating Facial Mist - Sukin make a fab range of natural skin care and this toner is fantastic for helping to hydrate skin. It comes with a pump spray nozzle so you can spray directly onto your face (the mist is very fine), before applying serum/moisturiser on top. I also use this sometimes over my makeup for a quick refresh. £8 125ml

Do you use a toner?

*This post contains PR samples. My views are honest as always.
Share:

24/06/2013

Bioderma Hydrabio Serum review

Bioderma. That word usually conjures up an image of one thing within the beauty blogging community: their infamous micellar water.

In fact, Bioderma offer a wide range of skincare, with ranges for dehydrated, oily and dry skin to name a few.


I've been testing out their Hydrabio serum*, part of the range designed to help rehydrate dehydrated skin. Dehydrated skin is where the skin is lacking in water, and is often affected by environmental factors such as the weather, stress and diet.

Hydrabio promises to hydrate skin, offering a 'flash' hydration effect, restoring the skin's ability to moisturise itself effectively.

Containing glycerine and hyaluronic acid (good for plumping), the serum is lightweight, almost gel like in consistency and pretty much scent less.

I apply two pumps post cleanser and toner, gently patting across my face, avoiding the eye area. It absorbs quickly, leaving skin feeling really soft, and moisturised. I apply my usual moisturiser over the top.

Since using the serum for about a month, I've noticed that my skin has started looking a little plumper, and I've also needed less moisturiser to hydrate my skin.

I've been really pleased with the results, especially as the Bioderma serum is half the price of my usual serum.  If you're already a fan of the micellar water, I urge you to try some of their other products - I'm loving them!

The Hydrabio serum costs £17.50, and can be found online from Escentuals (also at 1/3 off until end of June!), or in store at John Bell & Croyden London.

*This post contains PR samples. My views are honest as always.


Share:

23/06/2013

Charlotte Tilbury's House of Rock n Kohl

For just over a week Charlotte Tibury's House of Rock n Kohl took over the Wonder Room in Selfridges London. A celebration of all things makeup, Rock n Kohl held a series of evening talks with different speakers each evening.

All of the events had been supporting Kids Company, a charity which offers services to vulnerable children and young adults in London.

I attended a session on Wednesday which consisted of Charlotte Tilbury, Camila Batmanghelidjh from Kids Company and Sali Hughes acting as interviewer.

House of Rock n Kohl panel talk
L-R Charlotte Tilbury, Camila, Sali Hughes

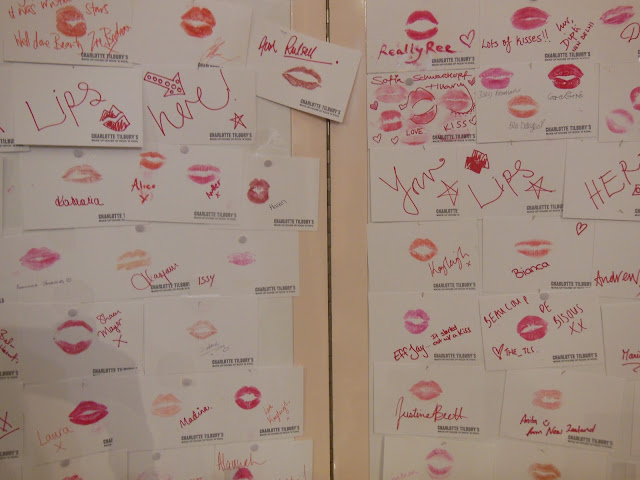
House of Rock n Kohl kissing wall
The kissing wall

House of Rock n Kohl

The panelists discussed how beauty partnerships can help charities, raising awareness and funds at the same time. A lot of the work that Kids Company do is helping teenagers and young adults who may have been sexually abused at home or victims of violence.

Camila is a very vibrant, interesting character. She makes her own clothes, which she says she uses as an expression of her happy mood. Once you've met her, you'll never forget her. She seemed extremely passionate about the work that she does with Kids Company, and it really inspired me.

What surprised me, was when Camila was discussing things that were most requested from the charity, food was number 1 followed closely by toiletries. A lot of these young adults now live alone on extremely small budgets and food and toiletries are the first things they drop in order to be able to continue to pay their other bills. They ask for toiletries as not only does it give them something to help keep clean but it also helps to restore their sense of pride in themselves, making them feel good.

This is something we can all relate too - how many of us have gone out and bought ourselves a new lipstick in order to cheer ourselves up after a bad day? Pampering ourselves is such a treat, and it's easy to forget how lucky most of us are to be in a situation where buying a new lipstick or even just some shower gel isn't one that we have to weigh up against paying our rent or buying something to eat.

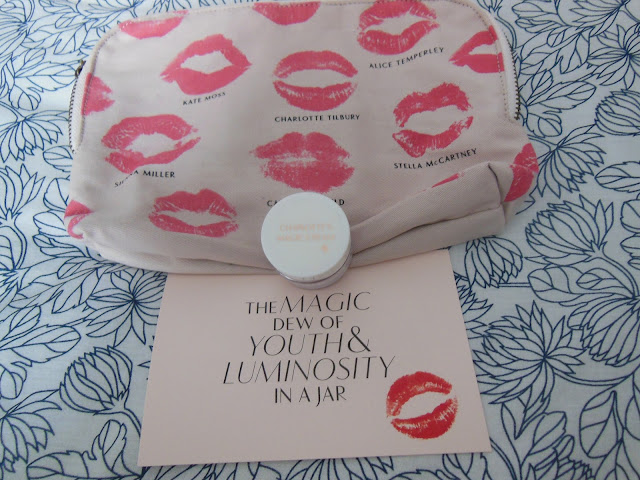
As part of the events, limited edition makeup bags had been created with some very famous lipstick kisses printed on them. Priced at £15, at least £10 from the sale of each one went to Kids Company - the perfect excuse for me to buy one!

House of Rock n Kohl makeup bag and magic cream

House of Rock n Kohl Charlotte Tilbury magic cream

Every attendee also received a small pot of Charlotte Tilbury's magic cream - a legendary moisturiser that she used to mix herself for makeup shoots, this is a sneak peek at what might be included in the collection she's launching in September.

The Rock n Kohl events finish on 23rd June, but a small number of makeup bags can still be bought online from the Selfridges website.

If you would like more information on how Kids Company or how you can help them, visit their website.


Share:

22/06/2013

Understanding Google Analytics - the basics

I wanted to do a quick post on the basics of understanding your Google Analytics dashboard, after chatting with a few bloggers who weren't sure how to interpret the stats after installing it. I hope that you find it useful, but feel free to get in touch if you have more questions.

The dashboard

When you log in to your Google Analytics (GA) account, you'll see the overview screen. This gives you a quick look at the most commonly looked at stats. You should see a cool little graph that plots how many people visited your site each day, and then underneath, you'll see lots of other information, which I've described below.

Date:
You can amend the date period you want to look at by clicking on the dates in the top right corner of the screen. GA will automatically select the latest 4 week period, not including the current day. You can choose to look at May, for example, or if you want to look at a longer period, just select the first day you want included on the calendars, and then the end date of the period. The rest of your stats will then adjust to this date period.

Visitors:
This number tells you how many people have come to your site in the period selected. It's less reliable than 'unique visitors', so while it's a good rough idea, I always use Unique Visitors to count how many people have viewed my blog, and it's the number that PRs will want to see if they ask for your stats.

Unique Visitors
This is a much more accurate representation of how many people have visited your site. This is because if the same person visits more than once in your selected period, GA will only record it here once. So if I visit your blog every day, I should only be counted once in your unique visitors.

Page Views
This is the total number of pages viewed during your selected period. So if I come to your blog and read one post, then click through to another post, this counts as 2 page views. If like me, you have several posts on the landing page of your blog, scrolling down and reading all of them only counts as 1 page view.

Bounce Rate
Bounce rates are the percentage of people that come to your site, and then leave after only visiting one page. So if you Tweet a link to a specific post and someone views that post and leaves, this counts as a bounce. If they click through to another post, this doesn't count as a bounce.

High bounce rates aren't always a bad thing. It can mean that the user has found what they were looking for and left. For example, if I searched Google for a review on Pixi's Glow Tonic and clicked through to a post on this, it gave me all the info I needed, and I left the page, This would still be a bounce.

Stats people used to talk about bounce rates as visits that only lasted a very short space of time. While this is still true, the more accurate description is of a single page visit, not just a very short one.

Blog bounce rates can average around 60%, so please don't worry if it looks like it's quite high. Use this in conjunction with time spent on site to see how engaged people are.

Average visit duration
This gives an average amount of time people spend on your blog. Google calculates this by adding up all the time all of your unique visitors spent on your site and divides it by the number of unique visitors to get an average amount.

This number is a good way to monitor how engaged people are with your blog - if the number goes up, then people are reading more, if it goes down, they're reading less. GA will display a time in hours, minutes and seconds:  00:01:02 for example, is 1 minute and 2 seconds.

Pages/Visit
This is another average, similar to average visit duration. It tells you the average number of pages viewed each time someone comes to your site. It's another good measure of engagement, as the more pages people read, the more engaged they are.

New vs returning visitors
This handy pie chart shows you how many people are new visitors to your blog, and how many people keep coming back to it. If you have a higher percentage of new visitors, it might mean you're getting a lot of traffic from Google searches. It's good to have a balance here - you want people to keep coming back to your blog, but also new people to find it.

So, that's the landing dashboard. I've highlighted a couple of other things which I think are really important too, as they help you to see how people are finding your blog.

How people get to your blog

In the left hand menu, go to the section marked 'Traffic Sources'. From the sub menu, select 'Sources' and then 'All Traffic'. You should then see a list of results, that could include, Google, Twitter, other blogs etc.

What each source type means:

Direct: Direct visits are where your blog url has either been directly typed into an internet browser, or accessed via a saved bookmark.

Referral: Someone has found your site from a link on another site. E.g. You tweet the link to your latest post and I click on it. This will be counted as a referral from Twitter. Another example is if I have a link to your blog in one of my blog posts and one of my visitors clicks on it, this will be counted as a referral from Tales of a Pale Face.

Organic - These are all visits from people using search engines. Most of them will be Google, but you might also see Bing, or other less well used search sites.

Search terms
Want to know which words people are using in Google to find your blog?

1. Go back to your left hand menu (you should still be in 'All Traffic' at the moment), and underneath 'All Traffic' should be 'Search'.
2. Click on 'Search' and then click 'Organic'.
3. This will give you a list of the keywords people have used to search and find your blog, in order of popularity.

I'm going to stop here, as it's turned into a bit of an essay! I hope that it's been useful, but if you have any questions, please just ask!


Share:

Essie Summer 2013 collection

The new summer collection from nail brand Essie is one of those collections where I want every polish! 6 new shades have been launched, made up of 5 shimmers and 1 creme finish.

The shades are:
Sunday funday - tangerine coral with a slight shimmer
The girls are out - soft fushia peony with a subtle sparkle
Full steam ahead - a pearlescent lilac
Rock the boat - shimmery french blue
Naughty nautical - teal with shimmer
The more the merrier - lime green creme


My favourites (and the two I bought) are Naughty Nautical a bold bluey green teal with a slight shimmer and The More the Merrier a super bright lime green creme, giving a nod to the current neon trend.

They come with the wider brush making application easy and both are opaque in 2 coats. Mine have lasted 3 days without a chip, which for someone who seems to be able to chip their nails while asleep is pretty good!

The new Essie collection is now available in Boots and are £7.99 each. They're also currently included in the buy one get one half price makeup deal so buy now if you can!

Will you be buying any of this collection?


Share:

21/06/2013

Soap and Glory SkinGenius launch

I recently popped along to the launch of Soap and Glory's revamped skincare ranges. Launching in Boots in September, all of your favourite products are still there (along with a few newbies), however, they have all be reformulated and repackaged.

I've used a few Soap and Glory products in my time and used to love their Peaches and Clean cleanser many moons ago. It was great to see the revitalised line - to me it just looks that little bit more grown up, and I enjoyed testing out lots of the products.


Soap and Glory new products

A few highlights for me were the Transparent BB cream - a primer style cream that can be applied alone or with makeup on top to help even skin tone and also offer an SPF25.

I also loved the sound of the Dr Spot blemish treatment, which contains salicylic acid to help clear up those unwanted breakouts!

Also popular was 'Glow Job' a tinted, bb cream style instant tanner, which leaves skin with a subtle glow. On me the 'glow' was more orange than subtle, so not one for pale skin, but perfect for medium complexions who want a little colour.

I took home 2 products to try out (the transparent BB cream and Rejuvenating Eye Cream) so look out for reviews on these coming soon.

What are you favourite Soap and Glory products?

Share:

20/06/2013

Susan Posnick ColorEssential lipstick review

Susan Posnick are a US brand that create makeup for women on the go. Developed by celeb make up artist Susan Posnick, the range came to life after she developed skin cancer, and wanted a mineral foundation that offered an SPF. 

Since the range launched in 2001, it's expanded and now has a wide range of products for eyes, lips and face. 

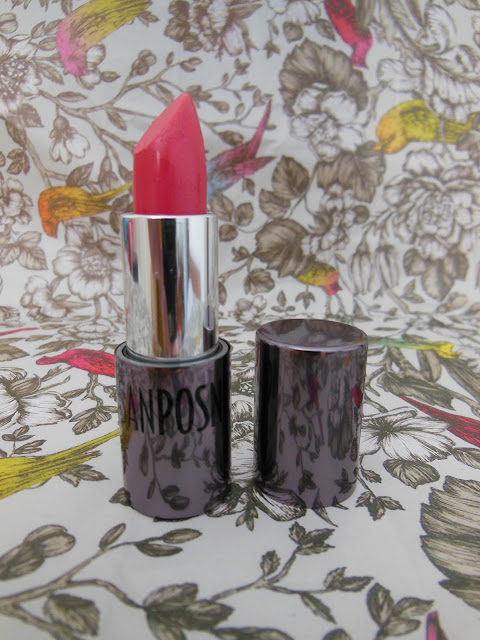
I've been testing out one of their new Colour Essential summer lipsticks, in the shade Shanghai*. All of the lipsticks in the range are designed to suit every skin tone and contain olive oil and vitamins A and E, for healthy lips and a rich feeling formula.

Susan Posnick Shanghai lipstick

Susan Posnick Shanghai lipstick on lips


Shanghai is a soft pink colour, which although it looks quite bright in the tube, actually applies quite sheer. It goes on smoothly, with no dragging and feels really soft on the lips. Lasting time is pretty good - about 3 hours (including drinking), before needing a little top up. 

I think this lipstick is perfect for those days where you fancy a little burst of colour, without wearing anything too bright. It's certainly made a nice change for me as I usually switch between neon pink lips or nothing at all, so having something in the middle has been the perfect solution. 

There are 15 shades in total in the ColorEssential range, and each lipstick costs £18.50. You can find them online from John and Ginger.  

*This post contains a PR sample. My views are honest as always. 


Share:

19/06/2013

Wishlist Wednesday: the accessories edition

As well as being a complete beauty junkie. I have a rather large penchant for accessories. Although most of my wardrobe is monochrome, I love to brighten things up with bright accessories. 

Here's what I'm coveting at the moment:

Michael Kors Stanthorpe Shoulder bag £330 - Michael Kors have been the serious subject of my bag love lately. This little beauty is currently in the sale, and I'm trying very hard to resist the snakeskin charms!

Giles for QVC lobster claw ring £19 - Big rings are my thing. The bigger the better. I've never seen anything like this lobster claw ring before, and come payday, I feel a sneaky QVC purchase coming on.

Lisa Snowden for QVC snake ring £139 - another QVC special, this one is a little more expensive, but reminds me of a vintage ring my friend has. It might be one that stays on the lust list as the price is a little high for my to justify, although it is sterling silver with diamonds (you can hear the justifications starting already...).

Zara neon box clutch £19.99 - It's bright, it's summery and it's plastic. Neons are really fashionable right now and whilst I'm probably not brave enough to wear neon clothes, a neon bag could be the perfect wardrobe addition.

Giles for QVC thorn ring £17.72 - The unusual shape of this ring really attracts me to it. I feel in love with this one at a recent QVC press day. It's going to have to be a toss up between this ring and the lobster claw I think.

What's on your wishlist at the moment?
Share:

18/06/2013

Fake tan testing - Kiko day by day tan review

For many years I've shied away from fake tans. They usually leave me looking, and smelling like a digestive biscuit. This year I've made it my mission to be a human guinea pig for you all and find some good fake tans, especially those that work for paler skin tones.

Top of my list is the Day by Day tan lotion* from Kiko cosmetics. Kiko are a reasonably new brand to hit the UK, originally hailing from Italy. I'd heard a lot of rave reviews about their makeup, so had high hopes for this every day tan.

Kiko Day by Day tanning lotion

The white, creamy lotion has an almost gel-like texture and is really easy to apply. As with all fake tans, I took special care around my ankles and knees to avoid streaky nobbly bits. It absorbed really quickly, and I went to bed, eagerly awaiting to see the results in the morning.

I woke up to a very subtle hint of colour, no horrible patches and best of all, no orange sheets. Result! I repeated again the following evening and this developed into a light golden tan, which still looked very natural. I did have a couple of darker patches, but I'm laying the blame for these at my crappy exfoliation beforehand (yes, you do still need to exfoliate before daily tanners).

I think that this does a great job, and of course if you fancy a darker tan, you can just keep applying every evening to build up your desired shade.

The Kiko Day by Day tan retails at £11.90 and can be found in Kiko stores and on their website.

*This post contains PR samples, my views are honest as always.


Share:

17/06/2013

Benefit Stay Flawless primer launch

Last week I went along to an event to hear all about an exciting new product from Benefit.


Stay Flawless is an innovative stick style primer, designed to keep makeup in place and promises to do so for up to 15 hours. A pretty impressive amount of time, especially if like me your makeup has normally disappeared by lunchtime!

We were given a demonstration by Lisa, Benefit's head make up artist, on how to use Stay Flawless. It's best applied using a circular motion across the face, before applying your foundation on the top.


Despite being slightly tinted in the tube, Stay Flawless actually applies transparently so works for all skin tones and won't interfere with the colour of your foundation.

I think the design is good, and very handbag friendly, although I'm not sure how well it will cope going around smaller areas around the nose, because of the circular shape.

I'll be putting Stay Flawless to the test over the next few weeks, so will post a further update. At the moment, results are looking promising! And if you're a fan of the Porefessional don't panic, this best seller is still staying a firm part of the Benefit arsenal.

Stay Flawless launches onto counters on 29th June and will cost £24.50.
Share:

16/06/2013

Serge Normant Haircare review

Serge Normant is a renowned hairdresser, who has worked on the hair of everyone from Cindy Crawford to Sarah Jessica Parker. 

The Serge Normant hair care range wasn't something I was familiar with before (sorry Serge), but when asked if I would like to test some out, after doing a little research, I leapt at the chance. 

The products are designed to make healthy, glamorous hair easy for women to achieve at home. I've been testing out 3 products over the past few weeks, and here's what I think.


Meta Velour Conditioner*
Designed to be deep conditioning without adding weight, the Meta Velour Conditioner is also suitable for coloured or over-processed hair. It contains natural botanical oils and essential fatty acids to make hair silky smooth and make hair bouncy. The formula is really thick  - it feels like you're squeezing a treatment mask out rather than  a traditional daily conditioner and really does leave hair soft, shiny and manageable. It didn't weigh down my fine hair at all, and smells divine. £19.30 for 236ml

Meta Luxe Hair Spray*
The hairspray comes out in a really fine mist and gives good hold, with no sticky feeling. It also smells amazing. Like hair perfume. That said, it's pricey. I'm not sure I could bring myself to pay £20 for a bottle of hairspray, even if it does make me want to sit and sniff my own hair. £20 for 221ml.

Meta Lush Volumiser*
Designed to add more volume to hair, this product should be sprayed at the roots for some added oomph. I really enjoyed using this on my fine hair, and have to say, it lived up to it's root lifting claims. It doesn't feel stiff or sticky, and contains proteins and vitamins to help add shine and manageability to hair. I found I didn't need to use lots of product to get a good 'lifted' effect either, making an expensive product better value for money. £22 for 150ml. 

The Serge Normant range also includes a dry shampoo, hair oil plus more styling products and can be found online at HQ Hair. Prices start at £10 for travel sizes and go up to £42.50 for an intensive treatment mask. 

Would you try this range? 


Share:

15/06/2013

Big fashion and beauty blog sale

It's blog sale time! This time I'm selling a mix of beauty items, plus also some fashion. I've ordered it in beauty first and fashion second, to make things a bit easier. 

A few guidelines:

1. Paypal payments only please. Please leave your email address in a comment with the items you would like and I will email you my details. 
2. Postage is to UK only and dependent on weight/size of the package. I will confirm this to you with a total figure based on your chosen items.
3. Some of the things I'm selling are vintage. This means listed sizes on labels don't necessarily match with modern ones, so if you would like measurements please let me know and I will send them to you.
4. I have stated the condition of all the items as best as I possibly can, but if you would like more info (especially the vintage stuff), please let me know. 
5. Items will be held for 24 hours before being offered to the next interested person if no payment received. 

Happy buying! 


Maybelline Color Tattoo - Light in Purple - New, sealed - £2.50
Wet n Wild eye shadow trio - Don't steal my Thunder - new, sealed - £4
Milani shadow quad - earthy delights - new, sealed - SOLD
Laura Mercier eye base mini (2.8g) - Wheat - new - SOLD

Max Factor giant stick pen - vibrant Pink - swatched - £2
Rimmel Apocalips - Big Bang - used x2 - SOLD
Rimmel Apocalips - Apocaliptic - used x2 - SOLD

ELF Glitter Gloss - Jewelled Jam - new - £2
Clinique butter shine lipstick travel size - Peek a boo - new - £3
Nars Velvet gloss pencil - Frivolous - swatched - £12


NYX cream blush - Tickled - new, sealed - £3
Bobbi Brown eye shadow - Sage - used x4 - SOLD


Ciate mini paint pot - Cabaret - new - £1.50
Ciate mini paint pot - Mistress - new - £1.50
Models Own - Lili's Pink - new, sealed - £2
Essie - Cascade Cool - new - £3
17 Rock Hard concrete effect - blue - new - £2


Nails Inc -  Lowndes Square - used x1 - SOLD
M&S - Gold Shimmer - new - £2
Models Own - Mixed Up - used x1 - £1
Ciate mini caviar - Sundance - £2.50
Seche - Memoire - new - £3

Clinique Moisture Surge moisturiser 30ml - used x 2 - £5
REN Rose Otto body cream 100ml - new - £5

Vintage sundress - approx size 8-10 - £12

Vintage 80s Brown leather biker jacket - approx size 10-12 - large on shoulders with very fitted waist - £25

Zara Orange mini shopper - used (inner pocket damaged, see below) - SOLD

Inner pocket has frayed and come away from the orange fabric strip, other than this bag in excellent condition.
Aldo tote - good, used condition - missing long strap - £12

Vintage black and white polka dot M&S dress, very mod. - Approx size 10 - £12

Topshop black faux leather paneled leggings - used x3 - size 12 - £8

Vintage crop top - approx size 8 - £8


Vintage fruit pattern skirt - approx size 10-12 - £8

White frilly vintage shirt - approx size 12-14 - £6

Vintage brown small cross body bag - £8
Black small vintage shoulder bag - £5

Topshop used leather shoulder bag - £10
Primark Glitter Clutch - new, no tag - £6

Vintage grey chain handle clutch bag - £5
Vintage red satchel style bag - £5


Vintage navy granny bag - £8

Black floral headband - £2
Lacy beaded ribbon necklace - SOLD

Giant faux pearls - £2
Palm Tree studs - £2

Vintage umbrella pattern scarf - £3
Vintage duck pattern scarf - SOLD

Massive vintage paisley red scarf (this is 1/4 of the scarf) - £8

Vintage adjustable navy and gold  waist belt - approx size 10-12 - £5


Vintage white leather gold buckle belt - fits approx size 12 - £4


Share:
© Tales of a Pale Face | UK beauty blog | All rights reserved.
Blog Layout Created by pipdig